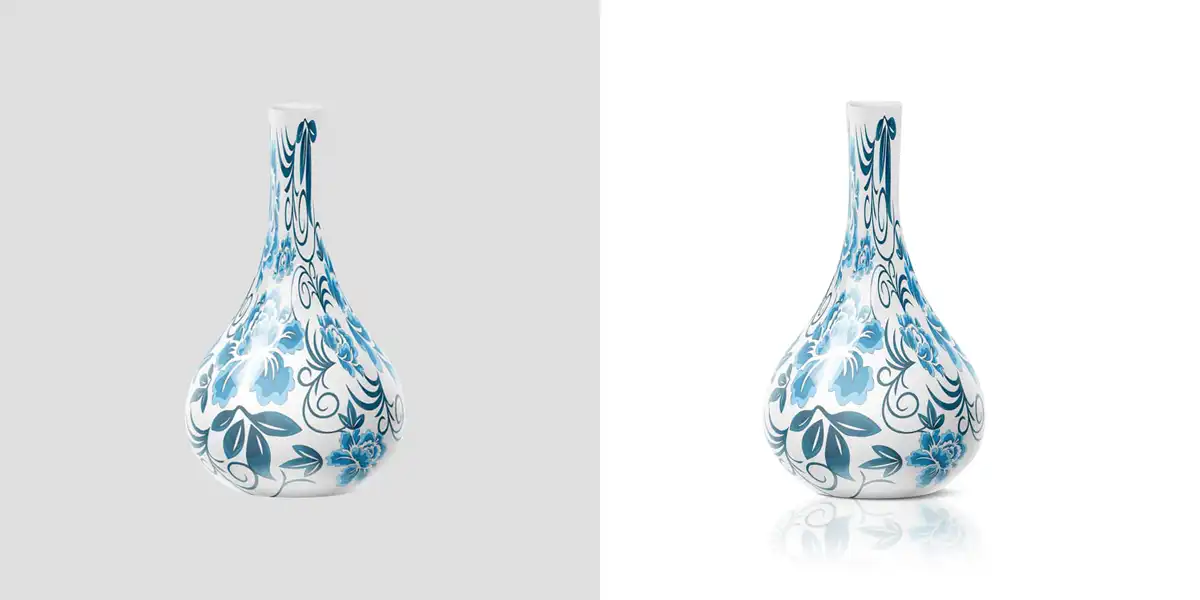
Adding a drop shadow in Photoshop is a powerful way to give depth and dimension to your designs, making elements stand out against the background. This guide will walk you through the process step-by-step, ensuring you can master this essential skill in Photoshop.
Introduction
Drop shadows are a common feature in graphic design, enhancing the visual appeal and professionalism of your work. Whether you’re designing a logo, a poster, or a web graphic, understanding how to create and manipulate drop shadows is a valuable skill.
Getting Started with Photoshop
Before we dive into adding drop shadows, ensure you have Adobe Photoshop installed and updated to the latest version. Familiarize yourself with the interface, especially the Layers panel and the Tools panel, as they are essential for this tutorial.
Step 1: Open Your Image in Photoshop
- Launch Photoshop.
- Go to
File > Openor pressCtrl + O(Windows) /Command + O(Mac) to open your image. - Navigate to your desired image file, select it, and click
Open.
Step 2: Select the Layer for Drop Shadow
- In the Layers panel, select the layer to which you want to add a drop shadow. This could be a text layer, a shape layer, or an image layer.
Step 3: Access the Layer Styles
- With the layer selected, go to the bottom of the Layers panel and click the
fxicon to open the Layer Style menu. - From the drop-down list, select
Drop Shadow. This will open the Layer Style dialog box with the Drop Shadow options.

Understanding the Drop Shadow Settings
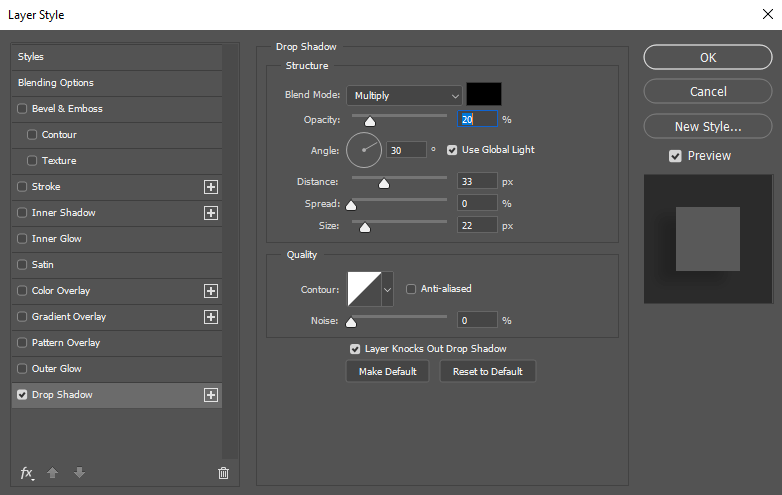
In the Layer Style dialog box, you’ll find various settings to customize your drop shadow. Here’s a detailed breakdown of each setting:
1. Blend Mode
- Blend Mode: Determines how the drop shadow blends with the layer below it. The default is
Multiply, which usually works well for shadows, but feel free to experiment with other blend modes to achieve different effects.
2. Opacity
- Opacity: Controls the transparency of the shadow. A higher percentage means a more opaque shadow, while a lower percentage makes it more transparent. Adjust this according to your design needs.
3. Angle
- Angle: Sets the direction of the light source, affecting the position of the shadow. You can manually enter a value or use the dial to change the angle. Checking the
Use Global Lightoption ensures consistency across multiple layers using shadows.
4. Distance
- Distance: Determines how far the shadow is from the layer. Increasing this value moves the shadow further away.
5. Spread
- Spread: Controls the hardness of the shadow’s edge. A higher spread value creates a harder, more defined shadow edge, while a lower spread value produces a softer edge.
6. Size
- Size: Adjusts the blur of the shadow. Larger sizes create a more diffused shadow, giving the effect of a softer, more realistic shadow.
7. Contour
- Contour: Shapes the falloff of the shadow. The default linear contour works for most cases, but experimenting with different contours can give unique effects.
8. Noise
- Noise: Adds grain to the shadow, which can be useful for creating certain textured effects. Use sparingly, as too much noise can make the shadow look unnatural.

Applying and Adjusting the Drop Shadow
Step 4: Customize the Drop Shadow
- Adjust the settings mentioned above to create the desired shadow effect. Start with the default values and tweak each setting incrementally to see how it changes the shadow.
- Preview your changes in real-time by keeping the Layer Style dialog box open while you adjust the settings.
Step 5: Fine-Tuning the Shadow
- After applying the drop shadow, you can further refine it by duplicating the layer and adjusting its properties.
- For a more complex shadow effect, consider using multiple drop shadows with different settings. To add another shadow, click the
+icon next to the Drop Shadow option in the Layer Style dialog box.
Advanced Techniques for Drop Shadows
Creating Realistic Shadows
To create more realistic shadows, consider the context of the light source in your design. Shadows should match the direction, distance, and softness dictated by the light source. For example, if your light source is far away, the shadow will be more diffused and lighter.
Layer Masking
- To refine the edges of your shadow, use layer masks. Create a layer mask on the shadow layer and use the brush tool with a soft edge to blend the shadow into the background more naturally.
- Layer masks allow for non-destructive editing, meaning you can always go back and adjust the mask without affecting the original shadow.
Multiple Light Sources
If your design has multiple light sources, you can create multiple drop shadows on the same layer to simulate this effect. Each shadow can have different angles, distances, and sizes to mimic the direction and intensity of each light source.
Experiment with Shadow Colors
Shadows don’t always have to be black or gray. Experiment with colored shadows to match the mood of your design. This is particularly useful in creative projects like posters, album covers, and digital art.
Combining Drop Shadows with Other Effects
Combine drop shadows with other layer styles such as inner shadows, glows, and bevels to create more complex and visually appealing effects. Layer styles can be stacked and adjusted independently, providing a high level of customization.

Practical Examples
Example 1: Adding a Drop Shadow to Text
- Create a new text layer by selecting the Text tool (
T) and typing your desired text. - Open the Layer Style dialog box and select
Drop Shadow. - Adjust the settings to create a subtle shadow that enhances the readability of the text without overwhelming it.
Example 2: Drop Shadow on a Logo
- Import your logo into Photoshop and place it on its own layer.
- Open the Layer Style dialog box and select
Drop Shadow. - Customize the shadow settings to match the branding style of the logo. Consider using a slightly larger size and softer edges for a more professional look.
Example 3: Complex Shadows for a 3D Effect
- Duplicate your layer multiple times and apply different drop shadow settings to each duplicate.
- Offset each layer slightly to create a layered shadow effect, enhancing the 3D appearance of the object.
- Use layer masks to blend the shadows smoothly.
Tips and Tricks
Tip 1: Save Layer Styles
Once you have created a drop shadow effect that you like, you can save it as a new style. In the Layer Style dialog box, click on New Style, name your style, and save it. This allows you to easily apply the same shadow effect to other layers in your project.
Tip 2: Use Adjustment Layers
If your shadow doesn’t quite match the rest of your image, consider using adjustment layers like Levels or Curves to fine-tune the contrast and brightness of the entire image, including the shadows.
Tip 3: Keyboard Shortcuts
- Quickly open the Layer Style dialog box by double-clicking on the layer in the Layers panel.
- Press
Alt + F + X(Windows) /Option + F + X(Mac) to open the Layer Style menu directly.
Tip 4: Smart Objects
Convert your layers to smart objects before applying drop shadows. This allows for non-destructive editing, meaning you can go back and adjust the shadow settings at any time without permanently altering the layer.
Tip 5: Use Global Light Wisely
When working on complex projects with multiple shadows, using the Global Light option ensures consistency. However, if you need different angles for different elements, make sure to uncheck this option for individual layers.
Common Mistakes and How to Avoid Them
Mistake 1: Overpowering Shadows
- Avoid making shadows too dark or too large, as this can distract from the main content. Subtle shadows usually look more professional and realistic.
Mistake 2: Inconsistent Lighting
- Ensure that all shadows in your project have a consistent light source. Inconsistent lighting can make your design look disjointed and unprofessional.
Mistake 3: Ignoring Context
- Consider the context and background when adding shadows. A shadow that looks good on a white background might not work on a darker or more complex background.
Mistake 4: Not Using Layer Masks
- Layer masks are essential for refining shadows. Neglecting to use them can result in harsh, unnatural edges.
Conclusion
Mastering the art of adding drop shadows in Photoshop can significantly enhance your design work, adding depth, realism, and a professional touch. By understanding the various settings and experimenting with different techniques, you can create compelling and visually appealing shadows for any project.
Remember, the key to a great drop shadow is subtlety and consistency. Practice these techniques regularly, and soon you’ll be able to add drop shadows effortlessly to any design, elevating your work to new heights.

